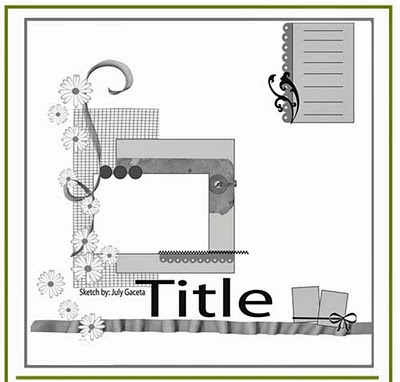
Well, let's kick off the New Year with a scrapbooking layout - this month's challenge with
Scrapology. We took a sketch from
Jana Eubank this month and created a double layout.
The rest of the design team worked with a Christmas theme, but I haven't taken that many photos of Christmas in the past - hopefully this year, that will all change.
I attended the wedding reception of a friend in October this year, and was really startled by her colour theme - so different and original. Her main colours were black and orange - the bridesmaids were in orange with grey accents - but her flowers were beautiful, being in tones of orange, red and yellow - real harvest colours and so rich.
I toned my layout accordingly. One of the things Fran did which I loved was have a photo booth at the back of the room, so everyone could go in and get photos done in groups, individually or however they liked. We were each given a copy of the photos, and one copy was given to Fran and Lee as a memento of their special day, with all their friends and family. I had never seen that idea before and thought it was perfect for scrapbookers and people in general who cherish their photos and their memories.
Supplies:
Bazzill cardstock (black and red)
Patterned papers: Daisy D's "Atelier Toile" (yellow), K & Co "Wild Saffron" (red swirl)
Alphabet stickers: American Crafts Sixth Avenue "Kennedy Black"
Prima Marketing: "Urban Cosmos" transparent scrapbooking tape
Martha Stewart decorative punch and butterfly punch
Stickles
You will see I varied my interpretation of the sketch in order to fit the photos I had chosen. The group of 4 booth photos were originally landscape in dimension, being two wide - but I placed them on top of one another so I could fit all the photos across the page. I also varied my layout by getting my photos to fit within each separate page. I am not a real fan of cutting into photos so they stretch across both pages - but I don't mind doing that with titles or embellishments, as you can see above.
So the placement of my photos was different, which meant also that I had to adapt the circle embellishment, as it didn't fit my layout. So I had a scramble through my stash, and substituted with the lovely swirly paper instead, which I felt coordinated perfectly.
I wanted to take the theme colours from the wedding and went mainly from the colours of the flowers. So I dug around in my stash and pulled bits and pieces out. The Daisy D's paper, despite being years old, I picked up fairly recently in a sale for about 10p a sheet! I originally bought two sheets, but had cut into one for cards, so I only had one sheet of the paper left. I started by cutting it into four, and stretching it across both layouts as I knew I could cover up the gap with something else. That is why the orange strip is a bit wider than I would like, but that width is minimised when I used the scrapbooking tape across it. The tape is VERY sticky - just like sticky tape - and you have to lay it down precisely. I got into a bit of a mess with it, but finally got it sorted.
Cutting out the swirl from the Wild Saffron paper took a solid couple of hours - I haven't done so much handcutting in ages - but I think it was worth the effort.
I covered the alpha stickers and the butterflies with stickles, not only to add some sparkle, but also to cover up a dirty little secret - both "e's" in "Lee" were cut from Bazzill, as I used up all my "e" stickers! I took the negative outline of the sticker, and cut around it with my craft knife. I hate wasting anything, and this way, you can't tell the difference. One way of making alpha stickers go further, if you don't want to use a mixed or altered alphabet.
Here's another tip - I printed out the journalling on white cardstock, making the alpha "white" with the background fill in orange. You can't read the journalling clearly from the picture, but it looks okay on the layout. In order to make my journalling box fit the dimensions exactly, I use a table in word, and make sure the outer dimensions of the cell fit with the space I have.
So here's to kicking off a new year with scrapbooking! I hope you join in with our double layout challenge.


