Search This Blog

Monday, 29 March 2010

Easter Mashed Up!

My poor sister has three major life events all happening at once - she has just returned to work from maternity leave to a new job, she is currently moving into a new home, and her daughter will shortly celebrate her first birthday with a party! 

So I had a mish-mash of cards to make recently - and seeing that I went to a crop yesterday and made one card, it was up at dawn today to get the cards done and posted to Australia in time for Easter. 


I made this one by chopping scraps up into various shapes.  The text print is 7gypsies tissue paper.

Here's my Easter cards so far.  First one is grungy stamping, second one very clean - coloured in with Copics.  I used up my scraps of Junkitz spring paper, I think it is. The flower stamp is Pink Paislee.  The word and circle stamping is Paula Pascual designs - I bought her stamps from the recent QVC craft day about a month ago.  Very clean, classic designs -will be invaluable. 


I borrowed my friend Tara's Martha Stewart loopy punch for the bottom.  All out of scraps.  I always think ginghams look good for Easter cards, even though these are going to Australia where it's autumn!


This last one was a rush job and think it's a bit busy for me.  Old Chatterbox stickers and some plastic lettering.  I actually cut into a piece of Teresa Collins for Junkitz Love Line 12 x 12 - go me!  The Vs were converted into A's using some 3D foam - a bit clumsy, but oh well!  Amazing how a simple white line within the red border gives the card a little bit of room to breathe. 

At least they're done and sent!  And hopefully not too late.  Another rush job tomorrow morning ....


Saturday, 20 March 2010

Grow

I'm not usually a fan of calling a layout by a phrase, but there seemed to be nothing else to call it...

A challenge layout I did today - challenge was to use only cardstock (no pp), a quote, and lots of embellishments!

Each person got a packet of Prima Brad Bitts at the recent Inspired retreat, and I don't really like big brads, so I designed this layout with the purpose of using them in one go. (I failed - I've got one left! :lol:) Vintage doily bought at a boot sale yonks ago, and I "doodled" around the edge of the layout with lots of ribbon and staples. Photo is me when I was 13 months old. I scanned the back of the photo and used it as my journalling because it is my grandmother's handwriting. The quote is from Heidi Grace and reads "It's where we go and what we do when we get there that tells us who we are". Joyce Carol Oates.

Products were vintage ribbon, bingo card, Jenni Bowlin ticket, Prima flowers, leaves cut out on the Cricut and the little birdy, branch and treehouse are a cute set from Hero Arts.  Doodlebug bling brads are silver.  Those Prima brads look skewiff here - they also have tulle circles with the brads. 

Friday, 19 March 2010

Mikado

I find that taking part in challenges make me scrap more, so that's why I am being more productive lately ... this particular challenge on our social group on UKS was to use a Pencil Lines sketch ... so here is hubby and I, from our last holiday to Mexico and our night out with friends at the all inclusive Japanese restaurant on site, the Mikado. 

The whole experience was more special than the actual food, as the chefs put on almost an acrobatic display with the food and the ingredients they were preparing!  Eggs were flying through the air, spatulas and forks were tossed around with gay abandon ... :lol:


All products used are Rusty Pickle Pashmina, apart from the orange strip at the bottom which is Sassafras Lass.  I also unearthed some Making Memories alphabet rub-ons for the title, and outlined them in blue pen to add some impact.

Wednesday, 17 March 2010

A girl can dream ...

This is a layout I made as a result of another challenge on UKS.  I loved the Jetsons and think it is my all time favourite cartoon.  Those mod-cons and labour saving devices in the show are ingenious, and I think the show really stands the test of time. 

I probably broke about a million gazillion copyright laws by downloading the images off the internet, but the end result is for my own personal artwork, so who gives a hoot?


A result of some of my lesser lucid moments, but the madness is held at bay if some of it is allowed to creep out occasionally :lol: ...

Wednesday, 10 March 2010

Fabric Flower

Being that my camera is not currently working, I will try to explain how I made that fabric flower on my "Without Measure" layout. 

Firstly, thanks to Lide de Witte who taught us to make paper flowers at Inspired using the following method:

Graduate each layer of the flower - ie, I cut the quilting fabric into a 6 x 6 square, then the red angelina is 5 1/2 x 5 1/2, then the lawn is 5 x 5. Fold the square into quarters, and then in half again, to form a triangle, keeping all open sides together. Cut a rounded petal shape at the top of the triangle, and then the bottom off to form the middle of the flower. Stitch around the middles and then gather. I layered up using giant glue dots and glue.  I tore strips out of the tissue paper and scrunched.  And then  I altered a bit of lace with the appropriately coloured Promarker.  I glued it all into place with wet glue and more glue dots.  Hopefully that will make sense!  It is really quite easy when you know how. 

Monday, 8 March 2010

UKS Weekly Challenge 2nd week March

I have the pleasure of setting the challenge on UKS this week -

The challenge is to use fabric/make your own embellishment and use old stash.


Here, everything on this layout is at least 4 years old, with the exception of the Prima Say it in Pearls, and the stamps. I also used a K & Co Life's Journey tag, and dry brushed paint over one of those paper self-adhesive borders. The title font is "Slobbery Kisses" (eergh!) and is a Sizzix 12" alphabet die. I painted over the black letters with purple and purple iridiscent paints mixed together so they have a shine to them. The flower is made from lots of layers - base layer is quilting fabric, next layer is like some coarse and stiff angelina fibre, the next layer is a fine lawn, and then centred with scrunched up 7 gypsies tissue paper, a shaped gold clip cut in half, and some twirled up lace coloured in with a purple Copic marker and glued in the middle of the rose.


The tissue paper and lawn were painted with a liquid mix of bronze Perfect Pearls, and there was also cinnamon Stickles splodged here and there intermittently around the flower.

The 6 x 6 background and tag were sent to me in a swap some years ago.  The postcard commemorates a visit to the Charles Hosner Morse museum of American art in Winter Park, Florida, made on a trip in 2005. (The museum pretty exclusively focuses on Louis Comfort Tiffany, who I just adore - and is a must see if you should ever go to Florida).  I used the postcard because photography was not allowed in the museum. 

I hope people firstly join in, but mostly - enjoy the challenge! 

Saturday, 6 March 2010

Somewhere in Between

Here's a layout I created using glimmer mists, Jo Sonja Opal Dust and paint.  I used the large Sizzix sun die which I don't use enough - I love it's shape.  The leaves were cut out on my Cricut machine.


The photo is of Clear Mountain in Brisbane at twilight where is where we got married.  It's one of my favourite songs ever - and now probably one of my favourite layouts.  Here is a close-up:


The font is "Zephyr" which I handcut, and also tried to emulate when I paraphrased the lyrics onto the layout.  I love how it glimmers and sparkles!

Tuesday, 2 March 2010

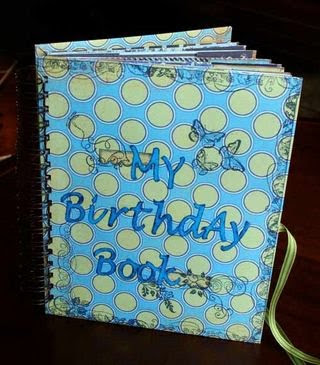
Birthday Book

I was a guest designer last year on It's a Creative World and being that crafting time is currently limited, I thought I would transfer my article to this blog. 

In 2008, concerned about my ever growing piles of stash, I concentrated on getting 2 huge projects completed from the supplies I had accumulated, and it is very satisfying to be able to now look back on these albums and flick through the pages, knowing that the execution of them cost me nothing extra apart from adhesives!

At the beginning of 2009, I was as concerned as ever to reduce my piles of patterned paper. I love it, of course – but my aim is to still reduce it enough to be able to justify a scrapbooking kit every month – that way, you are regularly getting a kit of the latest papers and embellishments, without feeling guilty that it is getting stockpiled.  

I drove myself crazy trying to remember birthdays, make sure I have made enough cards to send out on time, and try to think where I’ve left such and such’s date etc – so I decided to design a way to combine the dates of people’s birthdays, and specific cards I had made for them. So I came up with the idea of making a birthday book which would also hold cards for every month. I have taught this book in a couple of classes and – the girls loved this idea, which could also be adapted for keepsake books of some kind or another.

All the women on both sides of the family got a Birthday book last year, and I received positive feedback.  What also felt great was that I used a couple of hundred sheets of patterned paper - it felt great to use some of my older papers, that had been sitting there gathering dust.

The first book I made was using an assortment of miscellaneous heritage papers. The cover is 7 gypsies, title cut out on the “Storybook” Cartridge, and completed with gems and stamping.

My sister in law gave me a birthday kit from Papermania, which was birthday themed – so that was the basis for another book! I had two pieces of this Basic Grey Lilykate left over, so that was perfect for the covers. I used Basic Grey alphas, completed with stamping, flowers and gems.

This third one had a title using up old alpha stickers, covered in Stickles. Shame you can't see the glitter! 

This last one was made entirely from Basic Grey – predominantly Skate Shoppe. I still love the combination of colours!


You could use any type of papers to make this book – as long as they are of decent weight. Let’s take a further look inside:


I have made an “envelope” for each month, and you slip the appropriate cards in at the top. Embellish each envelope as much or as little you like!


You can theme each page according to the month – here, I stamped the month onto the index card. The idea is to fill in the details onto the card.

You can buy a pack of 100 index cards from stationery shops – mine were from Staples, and cost just under £2.00! They also come in different sizes and colours.

Naturally the book gets quite bulky when filled with cards, but if you leave enough ribbon to tie a generous bow, it really doesn’t matter how thick the book is – that is why it is best to make it a fairly decent length of ribbon.


I used a 3 inch circle punch at the top, and lined the envelope with co-ordinating patterned paper, so you didn’t see any of the white. It just looks more “finished” that way.

You can recycle backs of notebads for the covers, and use bookrings instead of the Bind It All system to connect it altogether.

The project is quite time consuming – no doubt about it – but very satisfying to complete. A friend will receive a lovely handmade present – and you will reduce that mountain of patterned paper – good job done!

Contact me with your email address if you want to receive a full set of instructions. :)

Scrunchy Flowers

Here is a brilliant link to really three dimensional scrunchy paper flowers ... so easy and quick to do ...

Monday, 1 March 2010

Inspired Mask

Thanks to MJ who took loads of photos - this is what I was doing at 2am on Friday morning - making this mask!  A friend gave me some peacock feathers two years ago and they finally came in handy!

My hot glue gun ensured the peacock feathers stayed in place, along with all the sequins around the edge.  It really was quite blingy IRL - Stickles come in very handy! Some of the ladies' outfits were quite amazing and their ballgowns were exquisite!  Shame the gentlemen in our lives couldn't have spirited us away to a lovely ball in a glass carriage ....