I was a guest designer last year on
It's a Creative World and being that crafting time is currently limited, I thought I would transfer my article to this blog.
In 2008, concerned about my ever growing piles of stash, I concentrated on getting 2 huge projects completed from the supplies I had accumulated, and it is very satisfying to be able to now look back on these albums and flick through the pages, knowing that the execution of them cost me nothing extra apart from adhesives!
At the beginning of 2009, I was as concerned as ever to reduce my piles of patterned paper. I love it, of course – but my aim is to still reduce it enough to be able to justify a scrapbooking kit every month – that way, you are regularly getting a kit of the latest papers and embellishments, without feeling guilty that it is getting stockpiled.
I drove myself crazy trying to remember birthdays, make sure I have made enough cards to send out on time, and try to think where I’ve left such and such’s date etc – so I decided to design a way to combine the dates of people’s birthdays, and specific cards I had made for them. So I came up with the idea of making a birthday book which would also hold cards for every month. I have taught this book in a couple of classes and – the girls loved this idea, which could also be adapted for keepsake books of some kind or another.
All the women on both sides of the family got a Birthday book last year, and I received positive feedback. What also felt great was that I used a couple of hundred sheets of patterned paper - it felt great to use some of my older papers, that had been sitting there gathering dust.
The first book I made was using an assortment of miscellaneous heritage papers. The cover is 7 gypsies, title cut out on the “Storybook” Cartridge, and completed with gems and stamping.
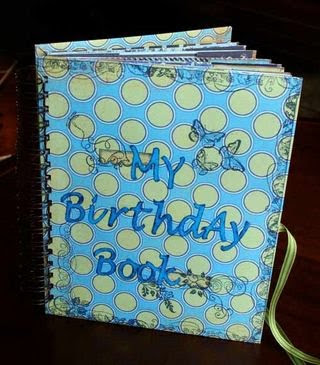
My sister in law gave me a birthday kit from Papermania, which was birthday themed – so that was the basis for another book! I had two pieces of this Basic Grey Lilykate left over, so that was perfect for the covers. I used Basic Grey alphas, completed with stamping, flowers and gems.
This third one had a title using up old alpha stickers, covered in Stickles. Shame you can't see the glitter!
This last one was made entirely from Basic Grey – predominantly Skate Shoppe. I still love the combination of colours!
You could use any type of papers to make this book – as long as they are of decent weight. Let’s take a further look inside:
I have made an “envelope” for each month, and you slip the appropriate cards in at the top. Embellish each envelope as much or as little you like!
You can theme each page according to the month – here, I stamped the month onto the index card. The idea is to fill in the details onto the card.
You can buy a pack of 100 index cards from stationery shops – mine were from Staples, and cost just under £2.00! They also come in different sizes and colours.
Naturally the book gets quite bulky when filled with cards, but if you leave enough ribbon to tie a generous bow, it really doesn’t matter how thick the book is – that is why it is best to make it a fairly decent length of ribbon.
I used a 3 inch circle punch at the top, and lined the envelope with co-ordinating patterned paper, so you didn’t see any of the white. It just looks more “finished” that way.
You can recycle backs of notebads for the covers, and use bookrings instead of the Bind It All system to connect it altogether.
The project is quite time consuming – no doubt about it – but very satisfying to complete. A friend will receive a lovely handmade present – and you will reduce that mountain of patterned paper – good job done!
Contact me with your email address if you want to receive a full set of instructions. :)


