Search This Blog

Sunday, 1 April 2012

April Sketchy Scrappers Challenge

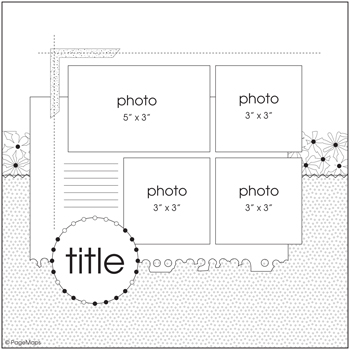
Jess posted this sketch for us to use as inspiration:


I thought it was a beautiful sketch to copy as is, but couldn't make it work exactly with the elements and the size photos I had chosen. 

This is my interpretation:


You can't see it clearly, but there is a light pink border of cardstock all away around the layout. 

Supplies:
Cardstock -
      K & Company Recycled - "Remake Berry Pinks" paperpad
      American Crafts Tropical A4
Cricut cartridge?
Patterned papers -
     Heidi Grace loving you - "Glitter circles"
     MAMBI Baby Boy
     ki memories
Quote Card - Cloud 9 Design 2 sided "Alyssa's Garden"
Stamps - Fancy Pants "Fresh Mod"
Date Stamp

I went rifling through my various scraps bags to begin with, to determine a colour scheme for my layout.  When I saw the Heidi Grace patterned paper, I knew I wanted to use it - it has laid patiently waiting for me to finish using it for many years and dates back to 2005!  Doesn't matter to me a jot how old it is - I love the fact that I am getting these things used - albeit very slowly!

Then I discovered this title in my pink scraps bag - I won the K & Co Remake pink cardstock pad at a crop 3-4 years ago, and must have cut this title out on the Cricut machine at that time.  So it incorporated the fancy die cut part of the sketch, but in a different format.  The straight line of circle elements at the right was a lateral interpretation of the middle strip and the big circle in the sketch.  I decided to swap out one photo at the bottom for some of that patterned paper.  I also had an even smaller scrap of ki memories pink and green circle patterned paper which I used to tie the bigger circles of the Heidi Grace paper together and give a bit more dimension to the layout.  So quite a simple interpretation of the sketch - I dithered for a long time before deciding it was finished as is, because I loved the swirly bits on the sketch so much! 

My journalling reads: "Thank you Life for blessing us with two beautiful boys.  In the short time you've been with us, we have already learnt so many things about being better people.  Above all, being good parents to you.  Daddy and I will love you always.  Mummy.  xxxx"

I really look forward to seeing what the other members of the group have produced! 


April Scrapology Layout Challenge - L is for Lace

Hi everyone and welcome to April - with this amazing bout of weather we've been having in the UK, it's felt like summer, more than spring - but with the clocks changing recently, it has been lovely to have more sunshine. 

This month we have scraplifted Bettylou1 with this particular layout:


The challenge was also to use lace.  Here is my layout below. 


I am very happy to report that all the supplies used are from years ago - with the exception of the flowers.  The photo is of my husband's parents taken with my twins when they were three weeks old.  I loved that Bettylou's layout was monochromatic, but felt that I had to try to coordinate the colour of their grandparents' attire with the layout.  Luckily enough, I found this ancient piece of Sandylion "Spring Flowers" paper that went beautifully with the photo. 

I adhered the paper to a piece of cardstock behind it, in order to make the layout more robust.  The three vertical strips are Cloud 9 Design - Alyssa's Garden - Botanical Notes collection.  I also deliberately kept the strips quite long so that they also became a feature of the layout.  The horizontal strip at the bottom was kindly given to me by my friend Jess - who allowed me to rifle through her scraps bag - and the piece of Fancy Pants Baby Mine collection "Strips"  was perfect here.  The white lace was from my ribbon bag, and the lovely green ruffled ribbon was bought from Artbase, before it sadly closed down some time ago.  The cream and blue dotty paper was diecut with a scallop edge, so I just used a corner of it here.  I inked all of the paper and cardstock edges with blue chalk ink so that they blended into the background and gave a softer finish to the layout. 

My picture was a different dimension, and my flowers were much larger than the original, so I configured them differently on the page.  I added some blue chalk ink to the flowers so that they were toned down a little and blended more into the background of the layout.  Then to further blend the flowers into the background of the layout, I cut out the lace plastic design on the Prima packaging and adhered it to the layout under the flowers. 

I borrowed my friend Lisa's nestabilities dies to cut out the journalling spot for the title - the alphas are MM Noteworthy "Tara" tiny alphabet stickers which again I've had for years.  Kind of ironic, in that another friend, Tara, lent me some flowers to form this layout. 

Supplies:
Patterned Paper:
      Sandylion Spring Flowers
      Cloud 9 Design Alyssa's Garden collection "Botanical Notes"
      Fancy Pants Baby Mine collection "Strips"
      Blue and Cream spotty paper
Lace
Ribbon
Wooden Heart and Bird - Hobbycraft
Metal Flowers with Brads - Dovecraft
Prima flowers
Prima packaging
Alphas:
      MM Noteworthy "Tara" tiny alphabet stickers

A lovely prize from Jill again at Cardinal Colours awaits the winner of the challenge! Join in, have a go and get another page scrapped!

Sunday, 25 March 2012

Stash Busting with Cards

I have had a spate of crafty friends' birthdays recently.  When I say crafty - some of them scrapbook, some of them don't.  Some of them make cards, some of them don't.  Being financially challenged, for the non-cardmakers, I decided to send them a present of a stack of cards for various occasions. 

Amongst other things, this is a selection of cards that I recently sent to my friend, Val. 


A good few years ago, Tara had given me miscellaneous size envelopes.  I think this was nearly the last lot I had left.  So I got to and made card blanks out of some of the card weight of the A4 bundle I bought from the Papermill when I originally started papercrafting.  The colour of the blank was determined by the colour of the envelope, naturally!

For the above card, I used a piece of 6 x 6 paper that came with a free stack from a card-making magazine, and a message spot from the free paper that came with the Scrapbooking Magazine once upon a time.  I haven't seen that magazine for a couple of years, so I am not sure if they are still doing that - but my card making has benefitted from those free papers over the years.  I stamped the message with the American Crafts "birthday" set of stamps, and added a hot pink felt flower I've had in my flower stash for many years. 


Here I added a birthday message from Craftwork Cards onto a blue circle to ground it.  I even had that orange star in my orange scraps bag!  I felt the pattern also worked well in this instance. 

These cards couldn't be simpler!  The following really proves it - a scalloped circle spot, a round birthday message, and a sticky border with some yellow ric rac and done! 


Spot a trend - they are really similar to each other in design - I just change around the elements a bit. 


So - by making a small batch of cards, it has used up some ribbon, some A4 card, some Craftwork Cards sentiments, and a bit more freebie mag paper.  And I am pretty sure that this present was made in the course of one evening - very productive use of my time, I would say! 

You will read more and more stash busting efforts mentioned here in the coming months - all gearing towards the big expected move next year. 

Tuesday, 6 March 2012

Sketch and Scrap February

Here was the sketch I chose for the UK Scrappers social group, Sketch and Scrap. 


I like multi-photo layouts, but don't often adhere to the exact size of the picture according to the sketch.  I have copied the dimensions almost exactly, to do a layout of Lewis and Henry at seven months old.  The photos were obviously taken after eating something very orange! The photos were taken on 6th Feb, and were scrapped on 5th March - I am pretty impressed with that, I must say.  Wish I was as well organised as all that!  Because the photos matched the dimensions of the layout, I copied it pretty exactly.  I nearly took a short cut and used rub-on stitching instead of the real thing, but I wanted some extra punch with colour and dimension, so am pleased I went with the black thread in the end.  So happy to use up more old patterned paper and am happy with how the layout turned out - it is very unusual for me to only use patterned paper, and cardstock only as an accent under journalling. 


Supplies:
Striped paper - unknown - perhaps Chatterbox? (It is the same texture ...., tells you how old it probably is)
My Mind's Eye Bloom and Grow Collection "Bloom" 2009
Prima Iron Orchid Designs line, Mary Jane collection "Steel Toe" 2007
Prima Just Corina Designs, Dude Collection, "Roundabout" 2008
Journalling spot - unknown
Rub-ons - perhaps Basic Grey?
K & Company handmade Alphabet embossed stickers

I outlined everything with a fine black journalling pen, to add some impact.  I think it makes a subtle but important difference in terms of delineation.  You can see the uncertainly of Lewis by the expression on his face - he was going through a very wobbly period in terms of eating savoury - thank goodness he seems to be largely over that now!

Sunday, 4 March 2012

G is for glitter!

This month at Scrapology, we are scraplifting a layout from the very talented Anita MacDonald.

Her layout is below. 


I decided to use the main central square as a starting point, and incorporated a square grid on a layout about Henry. 


The patterned papers are once again all from the "Up Up and Away" range by First Edition.  The background cardstock has a pearlescent sheen which I bought in bulk for a class from Two Peas some few years ago - I love cornflour blue.  The picture of Henry was taken when he was obviously teething really badly, poor baby.  I panic somewhat that I miss the boys' milestones when you get too busy doing day to day things, so one day I deliberately took out time to take ink prints of both boys' hand and foot prints. 

I emulated the die cut Bo Bunny paper in Anita's layout with some cut out patterned paper circles and I added a whimsical element by dusting off some of my brads, eyelets and snaps, along with the Cropodile!  

Winnie the Pooh is one of my favourite books and I just adore this quote - I think it is so poignant.  I was really pleased to break out my PSX "Playful" alphabet stamps once again and stamp out the quote.  I like the handmade, folksy quality of imperfection and think that elements like this give a layout heart and character. 

Supplies:
First Edition Up Up and Away
Blue Pearlescent Cardstock
MM brads, snaps, eyelets

I am always surprised when I hear that people have given up scrapbooking - I find ways of incorporating my babies' milestones together with images of things like their hands and feet so sentimental and touching and think that every family would treasure these kind of keepsakes of their family members. I hope that the boys will treasure the stories of their earliest years and look forward to seeing their albums in the future. 

Jill from Cardinal Colours is once again offering a fabulous prize this month - just follow the glitter trail to enter this challenge!

Monday, 20 February 2012

UKS Weekly Challenge - February Week 3

I am part of the Twilight Addicts social group on UK Scrappers, and it is our turn to set the challenge this week. 

As usual, the challenge consists of three parts - the first is to use the sketch below for 10 points. 


The second part of the challenge is to use a group of photos for the second lot of 10 points.  Finally,  for the last 10 points, we would like you to draw inspiration from a book for your title or colour scheme and make sure your reference this in your post. 

I created this layout below of Lewis at six months. 


You can see that I have swapped out two photos to use a hand and footprint of Lewis. 

I used the First Edition range of papers once again called "Up, up and Away" - I am so pleased that they are really versatile and go with most things to do with baby boys.  I used some lime green Bazzill "Just the Edge" strips to coordinate with the papers and then did some handcutting for the embellishment arrangement on the left hand side.  I took some time out one day to take hand and foot prints of both Henry and Lewis for their milestones, and used a pre-gessoed canvas sketch pad from the Poundshop which I have had for donkey's years - I knew it would come in handy some day! 

I had to think long and hard about a quote from a favourite book, but Winnie the Pooh has always been one of my lifelong favourites, and I hope it too will be one of my boys' favourites in the future.  I love the philosophy and the life messages contained in the stories - and how central the importance of meaningful relationships are to all the characters.  I like the handcrafted element to pages, and decided to use my PSX "Playful" alphabet stamps for the quote and the title.  Good to blow the dust off your tools occasionally!

I am very conscious that we are older parents, and through scrapbooking I want to leave my boys messages about how I would like to see them live their lives, and the kind of men they will be when they grow up, should we not be here to see that happen.  That is why the quote I have used is especially poigant to me:

"If there ever comes a day when we can't be together, keep me in your heart.  I'll stay there forever". 

I hope you join in with the challenge and have fun with it! 

Wednesday, 8 February 2012

Sketch and Scrap February

Here is the sketch we used this month - - -


and here below is the layout I created in response. 


It was the first time I used my "Pooh and Friends" Cricut cartridge.  Very fiddly and extremely time consuming, but worth the effort, I think!  I created the inner border with an inch circle punch and the side detail is supposed to emulate the stripes on Henry's shirt.  The colours are pulled directly from the boys' Tigger dungarees and shirts.  The alpha dome stickers are "Mod Designs" by Autumn Leaves and part of my stash busting challenge - they are at least five years old.  No matter how many circle punches I have, I find I never have enough ... I created the white circles underneath the stickers using a Quickutz bubble die.  The stickers really needed the white behind them for some added impact. 

The die-shaped lime green layout base was created by cutting 1/2 inch off each side, and then using an inch circle punch, measuring out evenly spaced semi-circles around the border. 

My journalling reads "Grandma Jones wrapped you both up in her fake fur and you were snuggled in Grandpa Jones' armchair.  At one stage, we could barely see you!"  Pics taken 30th August 2011.